Friday, August 10, 2012

China in my plate 2/2


Prawns and Fish Fried Rice

Serves Two

Preparation time:
Cutting/Chopping – 5mins
Deveining the prawns – 30mins
Preparing the marinade & marinating time – 35mins
Cooking time – 7-10mins

Ingredients:
Rice – One large bowl from yesterday’s leftover
Fish – Sheri (local Qatari fish) – 50gms
Prawns (frozen) – 50gms
White Onion (medium size) – 1/4
Spring Onion – 1no
Capsicum – Yellow – 1/8
Capsicum – Green – 1/8
Ginger chopped – 1tbsp
Garlic chopped – 1tbsp
Green Chilli – 1no
Lemon juice – 1/2tsp
Mixed Vegetables (Frozen – Carrots, Green Peas and Corn) – 20gms
Soy Sauce – ½tsp
Ground Black Pepper – A pinch
Sesame Oil – 2tbsp
Vinegar 1/8tsp
Salt

How I cut them:
The first and foremost task, even though the label on your frozen prawns packet says ‘cleaned and deveined’, is to check each prawn and devein by oneself. Cumbersome, but must be done.
I cut the fish into small pieces, the size same as that of the whole prawns.
I cut the chopped the vegetables into medium to small size pieces.
I chopped the chilly, garlic and ginger into small sized pieces.

How I cooked it:
I took half of the chopped chilli+garlic+ginger into a stone pounder and pound them well into a rough paste.
I then moved this paste into a bowl, tossed in the fish cubes and prawns and mixed them well. I then added the remaining half of the chilli+garlic+ginger and the lemon juice and mixed them well with my hand. When I saw that the fish and prawns were coated well in the mix, I covered the bowl with a plastic wrap and left in the fridge for half an hour.

While this mix was being marinated, I copped/cut all the vegetables.
By the end of 30mins, I heated sesame oil in a wok and fried the prawns and fish mix. When it was cooked, I moved them out on a plate.
Then, in the same wok I heated sesame oil in a wok over high flame. I swirled the wok around to ensure that the oil had coated the wok well till the top, rather than just staying settled at the bottom.

When the wok was hot and ready, I tossed in the vegetables and cooked them by tossing intermittently, which went on for around 3-4mins or so, after which I added in the rice, mixing them into the vegetables. The rice that I used was leftover rice from yesterday. They were in the fridge for the whole night.

When I felt that the mix was ready, I added the fish+prawns, some salt, ground black pepper, soy sauce and vinegar and mixed it well. Mixed it for a minute and the dish was ready!

The experience:

I was very happy with what I cooked. This recipe is good. It had a very authentic Chinese taste. The rice went well with the Fish Manchurian that I had cooked along with this. Find the Fish Manchurian recipe at:

Try it!

China In my plate 1/2


Fish Manchurian

Serves Two

Preparation time:
Cutting/Chopping – 5mins
Preparing the marinade & marinating time – 35mins
Cooking time – 7-10mins

Ingredients:
Fish – Sheri (local Qatari fish) – 120gms
White Onion (medium size) – 3/4
Spring Onion – 1no
Capsicum – Yellow – 1/8
Capsicum – Green – 1/8
Ginger chopped – 1tbsp
Garlic chopped – 1tbsp
Green Chilli – 1no
Mixed Vegetables (Frozen – Carrots, Green Peas and Corn) – 30gms
Corn Flour – 3tbsp (1 for the marinade and 2 for the sauce)
Soy Sauce – 1tsp (½ for the marinade and ½ for the sauce)
Cashew nuts – 10nos
Lemon juice – 1/8tsp (Just 4-5 drops)
Vinegar – ¼tsp
Red Chilli Powder – ¼tsp
Ground Black Pepper – 1/8tsp
Sesame Oil – 2tbsp (1 each for frying the fish and for the main cooking)
Salt

How I cut them:
I cut the fish into pieces of around 5cm long x 3cm wide pieces.
I cut the vegetables also into large size pieces. For the onion, I first divided it into two equal parts at the equator and then cut each piece radially into six equal pieces since I had used only 3/4th of an onion for this dish. Similarly the Capsicum and the Spring Onion was also cut into large pieces, having rough dimensions of 4cm to 5cm each.
I chopped the chilly, garlic and ginger into medium sized pieces.
I cut the cashews into halves.

How I cooked it:
I took half of the chopped chilli+garlic+ginger into a stone pounder and added the ground black pepper and pound them well into a rough paste.
I then moved this paste into a bowl, tossed in the fish cubes, soy sauce, corn flour, lemon juice and mixed them well with my hand. When I saw that the fish cubes were coated well in the mix, I covered the bowl with a plastic wrap and left in the fridge for half an hour.
While this mix was being marinated, I copped/cut all the vegetables.

By the end of 30mins, I heated sesame oil in a skillet and fried the fish. When the fish was done, I left it aside.
Then, I heated sesame oil in a wok over high flame. I swirled the wok around to ensure that the oil had coated the wok well till the top, rather than just staying settled at the bottom.
When the wok was hot and ready, I tossed in the remaining half of the chilli+garlic+ginger mix. 
After around 30secs or so, I added in all the vegetables in the wok and cooked them by tossing intermittently, which went on for a minute or so, after which I added in the cashew nuts, mixing them into the vegetables.
When the mix was turning brown, I added a cup of water and the remaining corn flour into the bowl in which I had marinated the fish and poured the mix in the wok.


I cooked the mix by continuously stirring it and, in between added the remaining soy sauce and vinegar. In about 3-4mins the watery mix had coagulated into thick gravy. The dish was ready!
 
The experience:
I was very happy with what I cooked. This recipe is good. It had a very authentic Chinese taste and I can openly vouch that, I can cook Chinese dishes well. I have come a long long way from the disastrous Chicken Manchurian that I had cooked way back in 2001.
However, this may not be the recipe for you if you are a pucca mallu food eater. For that, you’ll have to look up an Indianised Chinese recipe. Plenty of them are available in the net.  

If you are a connoisseur of authentic Chinese food, please try this and let me know your opinion. I really want to know how good/bad this one is.

Thursday, August 9, 2012

Snakes and Ladders

Peppered Paneer

Serves Two

Total Calories - 580 

Preparation time:

Cutting the paneer into cubes – 2mins
Mixing and Marinating time – 30mins
Frying – 2mins
Artwork on the dish – 5-7mins
Waiting for the paneer to cool down – 10mins
Preparing the plate – 7mins  

Ingredients:

Paneer (Indian Cottage Cheese) – 100gms
Oil – 2tbsp
Ground Black Pepper – 2tbsp
Rosemary – 1tsp
Lemon juice – 1tsp
Green Chillies – 2nos
Baby Carrots – 2nos
Tomato Sauce – 2ml
Mustard Sauce – 2ml
Whole Black Pepper – 21nos
Mayonnaise – 10ml
Food Colour – Blue – 2 drops
Salt 

Fining the right paneer:

I did have some precut ‘Amul’ paneer cubes in the freezer, but found out that they were in all shapes and sizes. I therefore went looking for that traditional Indian slab of paneer, similar to what we get from the ‘dugdhalayas’(milk shops) in Gujarat. After looking at many Indian supermarkets, I was lucky to find one in my own backyard, at Lulu’s Gharaffa store. Incidentally this was not in the Indian section; I found it in the special Cheeses section. This one has ‘Paneer’ written in Hindi on the cover but, it is manufactured in California, USA!!


One thing I found out that this paneer need not be placed in the freezer. You just have to refrigerate them. The advantage is that they are always soft and ready to use, unlike the regular packed ones, which need to be thawed each time.  These are good.


How I cut them:

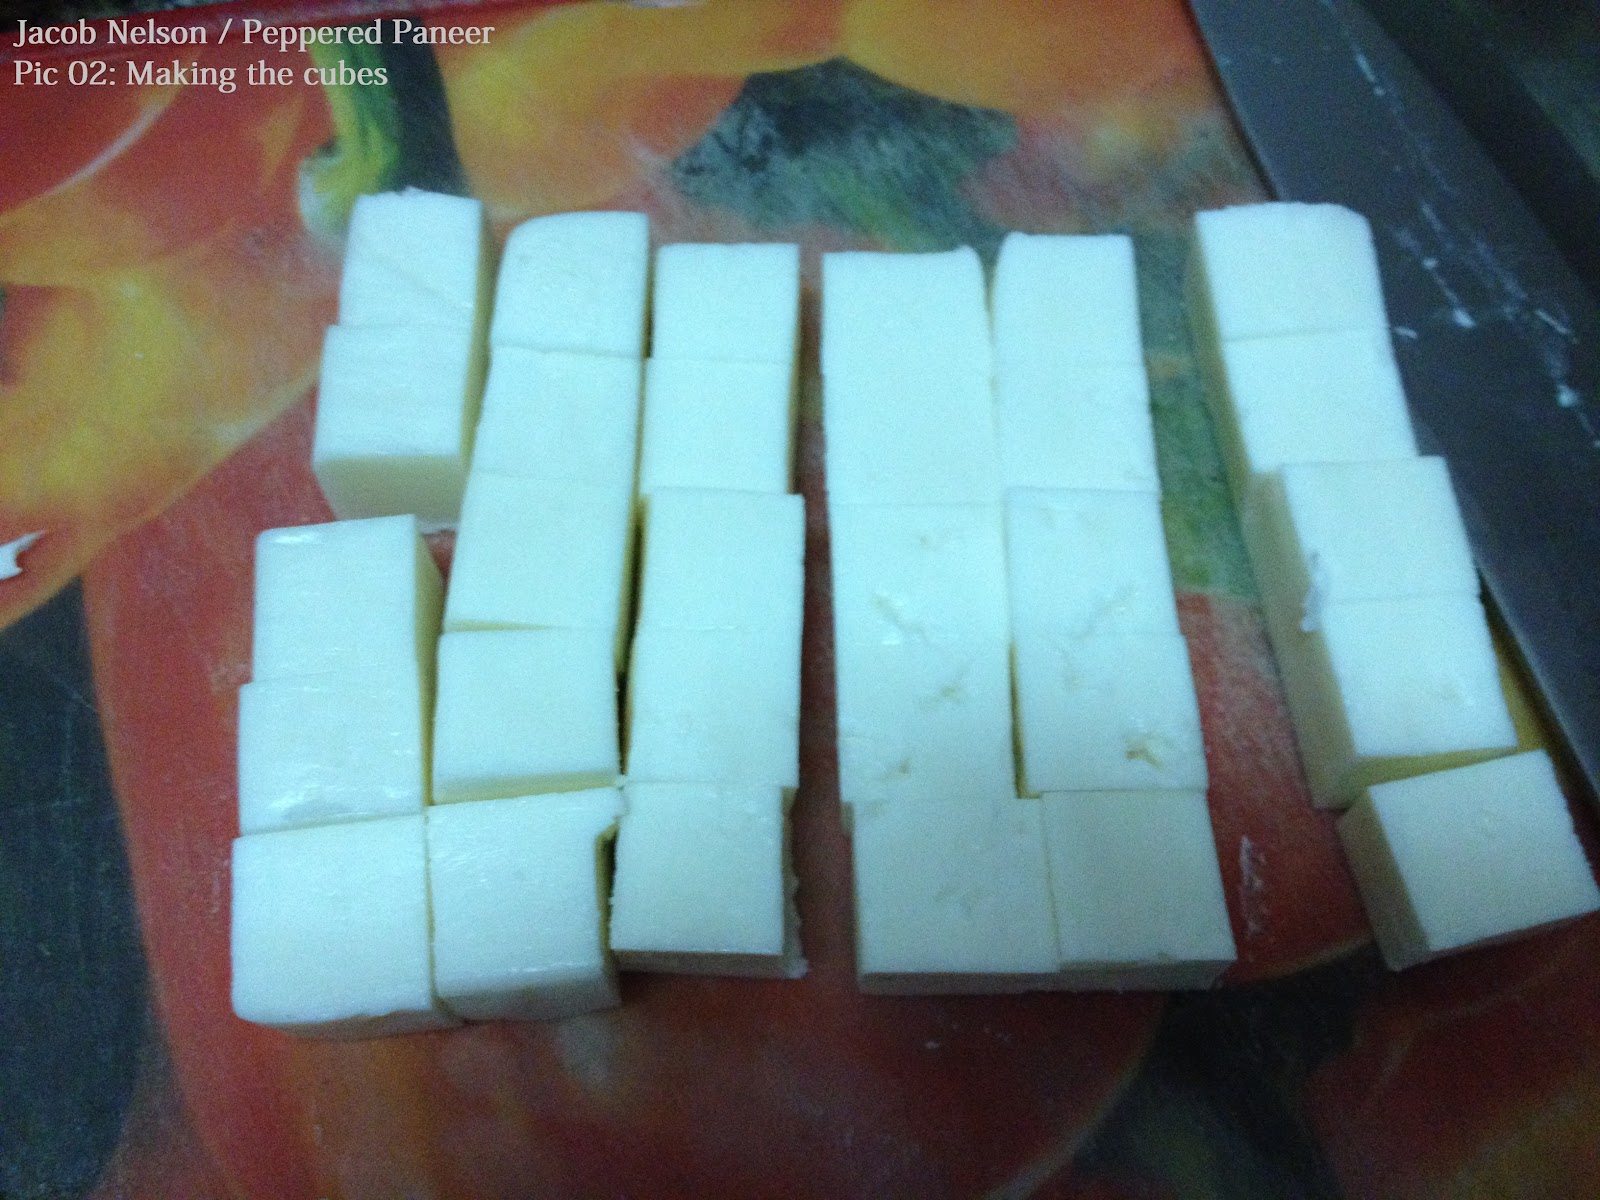
I wanted exactly 27nos of paneer cubes for this dish. I cut them into roughly 1cmx1cmx1cm sized cubes. I didn’t want them to be exact dimensions; just near about.

After I cut the paneer cubes, I just arranged them to check out how they look. Again, I was not so adamant about getting a perfect cube; just near about.

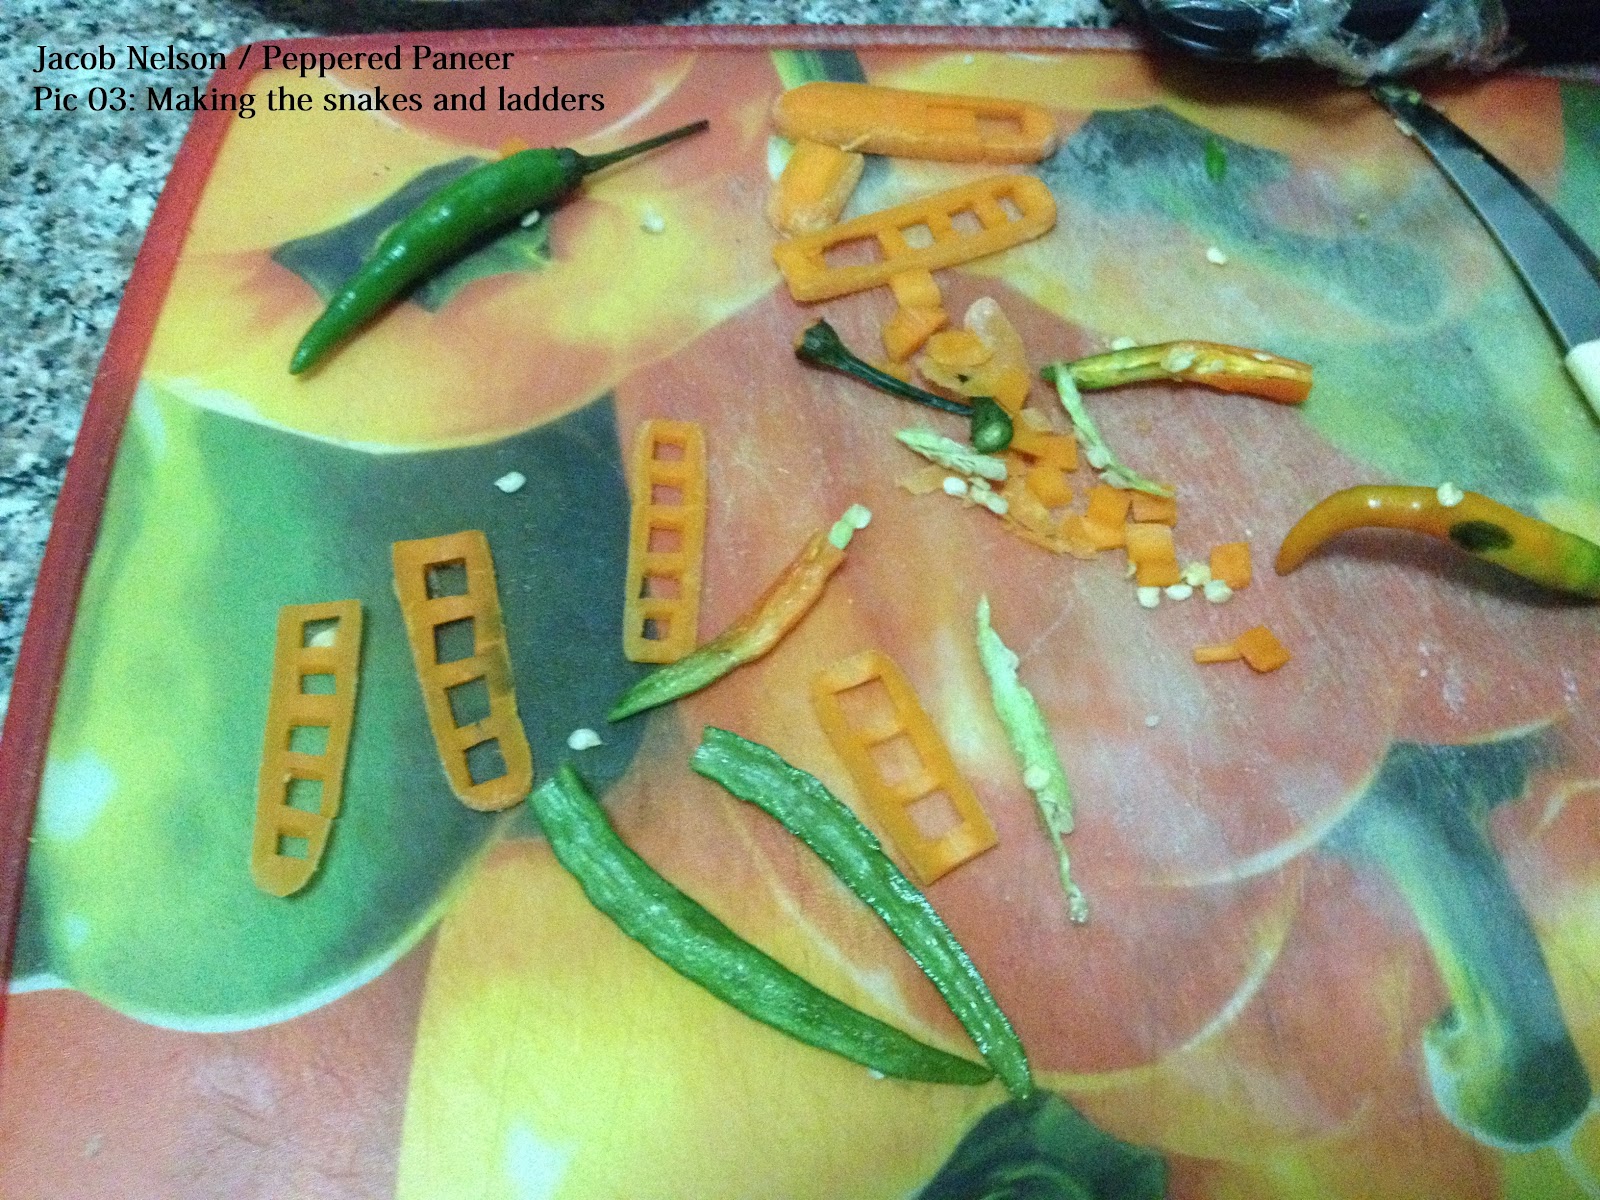
The baby carrots and green chillies were purely for garnishing, and I used the chillies to make out snakes. I slit them into halves and removed all the seeds. I used carrot to make out ladders by slicing each carrot lengthwise into strips and made holes to add rungs. 

How I cooked it:

The Main Dish

In a bowl, I mixed the ground pepper, rosemary and salt. Later I tossed in the paneer and added the lime juice.


I then covered the bowl with a plastic wrap and left it in the fridge to marinate for around half an hour.

I then heated the whole black peppers in a wok.

When the marinating as well as frying the whole black peppers was done, I heated oil in the wok over high flame and tossed in the paneer, cooking it by tossing the mix till it turned brownish. 


The Artwork

I used mayonnaise mixed with blue food colour to make the Snake and Ladder board. Then I placed the snakes and ladders randomly after which I made the dice by pushing in whole black pepper wherever required. 


The experience:

This was the second paneer dish that I made and again my conclusion is that it is not spicy enough. I should have added more ground black pepper to it. Certainly not spicy enough if you are planning to have this as a side dish for your hard drink but, may work for the kids though.

Yes the dice looks good but, I would not recommend anyone to make an arrangement like this. I myself will not do this again. Firstly, it is difficult to do all that arrangement when the paneer is still hot, and then, by the time it is cold, the food doesn’t taste that great. Again, I don’t know if using a gas torch for re-heating the paneer would work or not. Anyone who has one, please try and let me know.

Definitely, next time I pepper fry the paneer, I am planning to add in a couple of table spoons more of the ground pepper. Another thing I am contemplating is to inject some peppered water into the paneer using a syringe. Will it work? Let’s see.

Alternatively, using some engineering sense the size of paneer could also be reduced to half, that is, each cube of 1cmx1cmx1cm could be made into eight cubes of ½cmx½cmx½cm, that’d double the surface area, which means you’ll have double the surface area to stick the pepper on, and also further add the additional black pepper and make it spicier by not reducing the quantity of paneer.  

Wednesday, August 8, 2012

Butterflies in my Tummy

Cheese and Omelette Sandwich


Serves One
Total Calories - 900 
Ingredients:

Classic Bran Bread – 4 slices
Egg – 2nos
Butter – 10gms
Cheese slice – 2nos
Oil – 2tbsp
Ground Black Pepper – ¼tsp
Cinnamon powder – ¾tsp
Mayonnaise – 10ml
Tomato Sauce – 7ml
Mustard Sauce – two drops!
Food Colour – Green – 1/8tsp
Salt 

How I cooked it:

The Omelette

I whisked the eggs and milk into a frothy and evenly coloured mix. This process requires rigorous whisking for around 30 seconds to a minute or so depending on the process that one would use for whisking. I’d whisked it in a steel glass using a fork, which took me around a minute. Midway the whisking, I added the Ground Black Pepper and Cinnamon powder to the mix.

Then, I heated oil in a Skillet on low flame and poured in half of the beaten egg mix spreading it throughout the Skillet. As the omelette was getting cooked, I swirled the Skillet to ensure that the mix had spread evenly and not remained concentrated on the centre and sprinkled in some salt.


When done, I moved the omelette on to a plate, where I cut it into two equal parts.

The Sandwich

I placed the first piece of omelette over a slice of bread, on which I placed a Cheese slice and later sandwiched the Cheese Slice with another piece of omelette and bread over it.


I then heated some butter over the same Skillet and toasted the sandwich in this.


The Artwork

I used a butterfly shaped cookie cutter to cut the sandwich into shape.


For the sauces, I used tomato sauce with which I made the flower petals and mustard sauce for the core. For the stem and leaf, I used mayonnaise mixed with green colour.  


The experience:

This was designed for a kid and that’s why the taste was more on the sweeter side, very cinnamon-ey and sweet.  For an adult this is just an okay sandwich. I did add some ground pepper to it, just because I’ve decided that I’d have pepper in each of my dishes, just like a signature. I prefer my eggs with onion and lots of pepper and, if I had to make it again just for myself I’d do it like that.

This one will definitely work great if you make it for the kids. I am planning to do this on a weekend when my boys are back from the vacation.

All in all the ingredients amount to 1000 calories. But since it has been cut out in the shape of a butterfly, I have reduced 10% towards the wastage (this goes into the Cook’s tummy). So, in net a good filling breakfast that will give your kid 900 Calories.

If this is being served as an evening snack, you can make the sandwich lighter by 250 calories by just taking off the cheese slices. But if your kid is an active kid, I’d recommend leaving them as it is. In short, add or take out as you like.

Since I was the cook as well as the diner, I got to eat the whole stuff including the wastage. My tummy soaked the sandwich with a large glassful of Acai Berry Juice, which gave me an additional of 250 calories. All in all I am energy packed today with 1250 calories in my belly.


Cookie cutters of various sizes are available in the baking section of most hypermarkets. So try something similar for your kids. Maybe an animal shape or a cartoon character and do let me know how your kids reacted to it.

Tuesday, August 7, 2012

Jhinga Rangrez

Jhinga Rangrez (The Dyer’s prawns) is a spicy starter dish that I created on Saturday, 4 August 2012.


It was a weekend, but it was also the month of Ramadan and peak summer time, I hadn’t much options to venture out, so was mostly at home during the day. With three broken AC’s in the house and a Sudanese Agent whose favourite line is “I repair, Inshallah tomorrow” my life was limited to the Loo, Beth’s Kitchen and the Study/Dining Room, which I turned into a studio apartment by shifting in single mattresses from the kids room.

My wife and kids had been away on a vacation for almost a month now and I had turned into that self-sufficient forced bachelor who could cook his own food and mix his own drink. The day before I had got home a packet of frozen prawns and intended to do something with it, but didn’t know what. I wasn’t able to decide what to go with, whether it should be the traditional Spicy Kerala Konju Dry Fry or the Prawns Koliwada? To help decide, I went on and read through many online cookery blogs and finally decided to go for Prawns Koliwada.

Although I had picked the frozen prawns’ packet with the tag ‘Cleaned and Deveined’ these prawns were not actually deveined. While I was going about with the arduous task of deveining each prawn, I noticed some small bottles that my wife had left next to the spices rack. I got an idea, and concocted this dish.

Here’s how I did it.

The Recipe

Serves One

Preparation time:

Thawing the frozen prawns – 20mins
Deveining the prawns (which, as per the packet are already deveined) – An eon!
Cutting/chopping, making the marinade - 10mins
Marinating time – 30mins
Mixing the batter – 5mins
Waiting – 10mins
Frying – 5mins

Ingredients:

Prawns – 150gms
Onion – 1no
Ginger chopped – 2tsp
Garlic chopped – 2tsp
Green chillies – 5nos
Lemon juice (bottled) – 3tsp
Corn Flour – 3tbsp
Cumin powder – 1½tsp
Ground Black Pepper – 1½tsp
Food Colours – Blue, Green & Red – ¼tsp each
Oil – sufficient for deep frying
Salt


How I cut them:
I chopped the ginger, garlic and 2/5 chillies finely which went into the marinade.
I cut the onion into rings slicing them staring from the stem to the root. I used the onions for garnishing.

How I cooked it:

The Marinade
I mixed the ginger, garlic, chillies and pounded them lightly in a traditional Indian stone pounder. Later, I moved the wet masala into a mixing bowl and mixed them with prawns and lemon juice ensuring that the juices from the masala coated the prawns well. I then covered the bowl with a plastic wrap and left it in the fridge for 30 minutes.


After 30 minutes I took them out and made three equal portions.

The batter
In three small bowls I added the following:
·         Corn Flour – 1tbsp
·         Cumin powder –½tsp
·         Ground Black Pepper – ½tsp


I mixed them well and added the shrimps into the dry mix. I stopped mixing when I saw that the flour had coated the prawns well.


I did not add any water the mix.
The twist
In the three bowls I added ¼tsp of a separate colour and mixed it with a spoon.


And finally
In a Skillet I heated oil enough, to deep fry the prawns. When the oil was really hot, I fried the prawns and took them out on a plate lined with tissue.
I fried the remaining 3 chillies for garnishing.

After the tissue had soaked up all the unwanted oil, I placed the prawns in three sectors over a layer of loosely thrown onion rings and separated the sectors with fried chillies.  

The experience:
Crackling, yet soft and spicy! It went well with my large peg of Glenfiddich. If only I had made more, I’d have had a couple of drinks extra.
As expected, the colouring did WOW me because I’d never before seen fried prawns in any colour other than red.
Since red, blue and green are the basic colours, there’s no limit on how many different colours that one could make out of them. Actually, the food and health expert in the house and the owner of our kitchen, my wife does not advocate using food colours, nevertheless I tried. The ones that we have now were brought to make safe coloured clay for my kids using flour. Little did I know that it would end up like this?
Since the basic marinade was the same for all the three coloured prawns, they tasted the same. Colouring them differently did not alter their taste. However it did affect the presentation hugely.

I am planning to make more of them to wow my friends when I invite them on my next drinks party. And while I do that, I am planning to use at least over a kilo of prawns, more colours and am planning to mix them up in a bowl and present them just like m&m’s.

Why don’t you try it first and let me know how it comes out?